Home automation has been around over few decades. With the advancement of technology and internet, it has become prevalent and accessible. However, it’s no secret that it has also become fragmented, less secure and less private. We are living through the times where corporates control and own your data including the videos your security cameras record (Read the fine print).
Thankfully, selfless programmers and technologists continue to build solutions that is more secure and help you keep your content private with zero to minimal recurring cost. However, most of them would require some technical knowledge and skills.
This article is geared towards helping gadgeteers and tinkerers build a home security & automation through the most commonly used platforms while keeping their devices disconnected from internet. I will go through the setup detailing what I have accomplished at my home with all my home automation devices kept away from internet. You will need some technical background to follow this post.
My Setup
I chose a desktop running Windows 11 as my primary machine as I am familiar and comfortable with Windows as an OS. I did debate using Windows Server Core as an alternate but finally decided not to as I will face issues with driver compatibility down the road should I choose to integrate with other hardware.
Unlike most home automation enthusiasts, I am not using an old PC or a Raspberry Pi. While there is nothing wrong with those, I wanted to future proof my machine and run without glitches. It’s a workstation with Xeon processor, Nvidia mid-level graphics card and M2 SSD. I would recommend having a decent configuration should you wish to leverage WSL and want to run HA and Frigate out the same machine. You can however follow the same setup and create two independent machines.
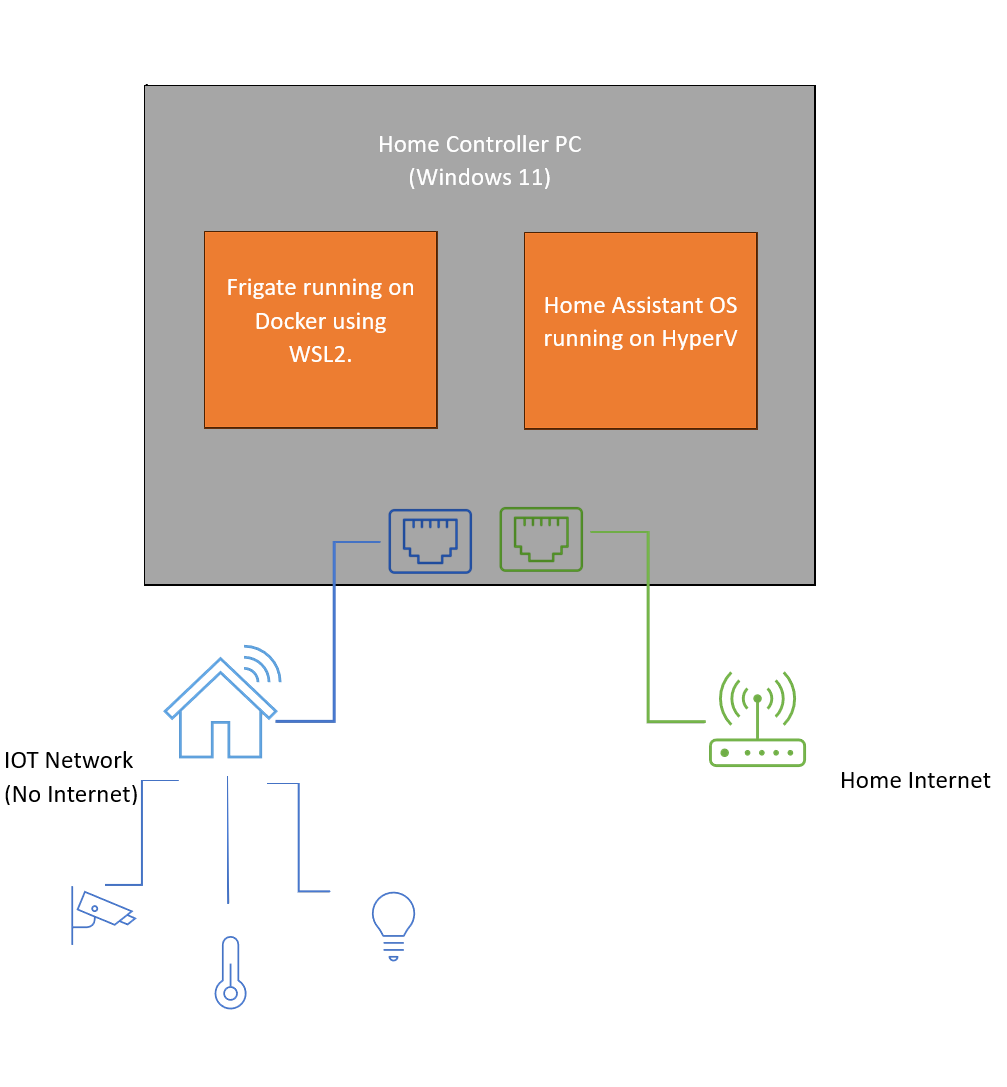
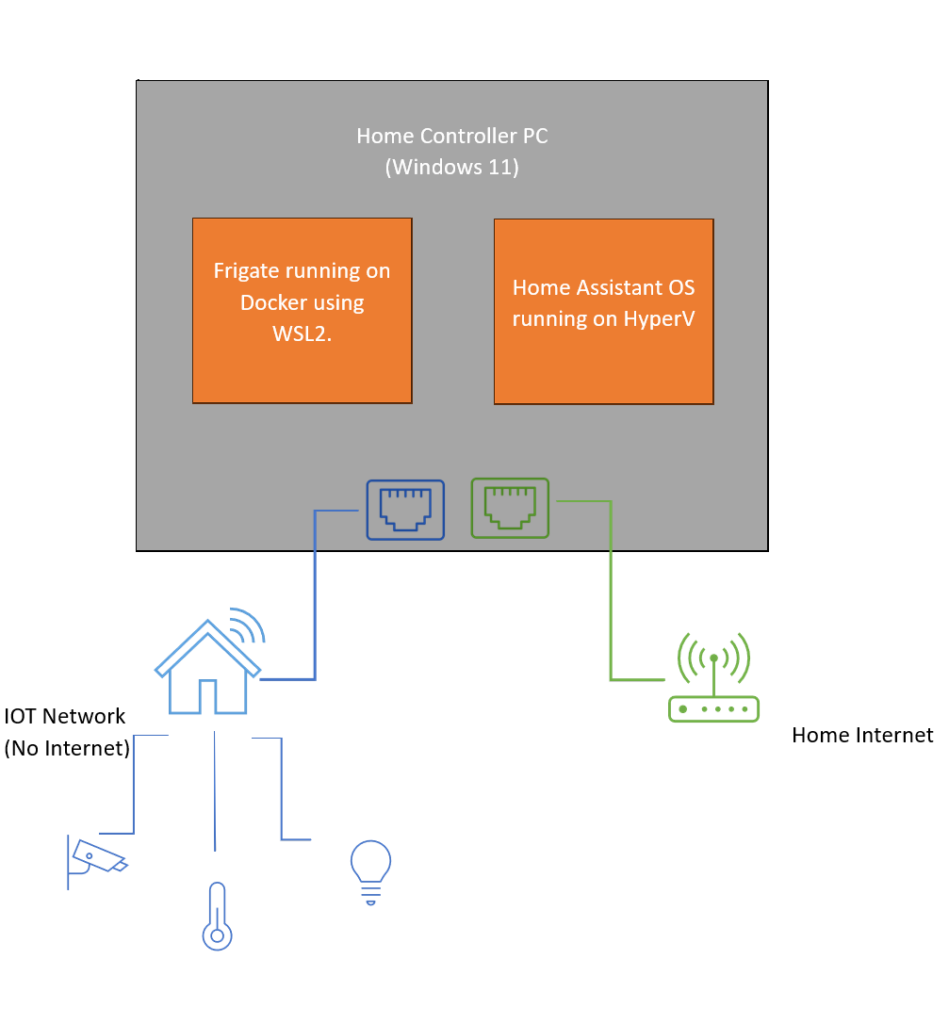
The PC has two network connections,
- An IOT network connected to router that has no internet connection. It also acts as a DHCP server for all the home automation devices such as thermostats, sensors, cameras etc. I assigned them with a series of 20.0.0.x as their IP addresses.
- A network connected to home internet. It also acts as a DHCP server for my PC and other devices such as phones, PCs, TVs that are directly connected to the internet. I assigned them with a series of 10.0.0.x as their IP addresses.
So, in a nutshell, the home controller PC can be identified in both IOT and home network. For both the networks, I used routers with their own SSID. I recommend allocating static IP addresses to the home automation machine in both the networks.
Setting up IP Cameras
If you are still looking for IP cameras, pay attention to the protocols it supports and how it powers up. While your requirements may not be the same as mine, I looked for few requirements.
- Support for PoE
- Support for RTSP. Most NVRs (hardware / software) support RTSP and its always wise to choose something that has a wide support.
I connected all my cameras to a POE Switch which then connects to my IOT router. By default, most IP cameras come with automatic configuration for IP addresses. Ensure that your IOT network router is configured with an IP range that is different from your home internet range. This is required if you wish to keep them completely isolated and manage them without confusion.
I would recommend you connect the camera the first time to a network with internet connection and update the firmware if any. Alternatively, you can download the firmware and update them manually too.
Installing Frigate
I scoured the internet for different options that would allow me to integrate with HA and at the same time I can manage it separately. After few days, I zeroed in on Frigate.
While there are plenty of security camera models that come with software that would integrate with HA, there is none that comes with the ability to stay away from internet. The ability to run locally is a prime requirement for me. The secondary requirements were, stand-alone NVR software, object-detection that can integrate with HA.
Frigate can be installed in many ways. In my case, I wanted to run it independently, utilize the same PC for Frigate, HA, etc. So, it all made sense to me to leverage the docker path.
Configure WSL2, install Ubuntu, set up Docker
Open the terminal in admin mode and install wsl and then you can choose your favorite Linux distro. I chose to install Ubuntu. Follow the instructions in Install WSL | Microsoft Learn. The documentation I shared is very exhaustive and I would skip repeating the same.
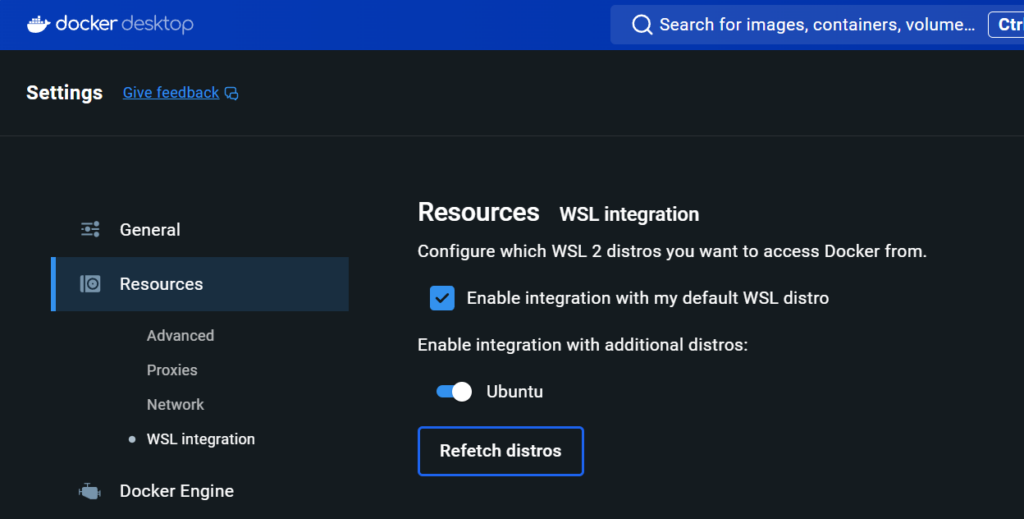
If you are a Docker savvy, then you wouldn’t require a Docker desktop. However, if you breathe windows, just go ahead and install Docker Desktop. If you chose to install Docker Desktop, ensure that you enable WSL integration and select the distro you installed.
Setup Frigate Docker
I would recommend you allocate a separate drive for keeping Frigate image, recordings, etc. If you have few more additional drives, keep the image and recordings separate. In my case, I had two drives and therefore, I allocated one for OS and HA and another for Frigate and its contents. This will allow me to move my docker and videos separately if required.
- Create a folder “Docker\Frigate” in the drive where you want to install Frigate.
- Create a file “Compose.yaml” which will contain the config for setting up frigate docker image.
Mine looks like below. The important things to notice are the config path and the media path that you configure. This will correspond to the path where you want Frigate to store the config and the recorded media. At this point, I am leveraging GPU for my object detection and hence, I have ensured to specify nvidia as my gpu driver. Frigate recommends using Coral Accelerator and I intend to use one in the future.
version: "3.9"
services:
  frigate:
    container_name: frigate
    privileged: true # this may not be necessary for all setups
    restart: unless-stopped
    image: ghcr.io/blakeblackshear/frigate:stable
    deploy:
      resources:
        reservations:
          devices:
            - driver: nvidia
              count: 1 # number of GPUs
              capabilities:
                - gpu
                - utility
                - compute
                - video
    shm_size: "512mb" # update for your cameras based on calculation above
    volumes:
      - \\wsl.localhost\Ubuntu\etc\localtime:/etc/localtime:ro
      - d:/docker/frigate/config:/config
      - d:/docker/frigate/data/media:/media/frigate
      - type: tmpfs # Optional: 1GB of memory, reduces SSD/SD Card wear
        target: /tmp/cache
        tmpfs:
          size: 1000000000
    ports:
      - "5000:5000"
      - "8554:8554" # RTSP feeds
      - "8555:8555/tcp" # WebRTC over tcp
      - "8555:8555/udp" # WebRTC over udp1
Save the file. Launch terminal, navigate to the path “D:\Docker\Frigate” and run “docker compose” from the terminal. If you have installed Docker desktop, you should now see frigate image, getting downloaded and startup.
While we have configured frigate docker, we still need to configure the settings for Frigate itself. Without that, Frigate may not run. Navigate to Frigate config folder. In my case, “D:\Docker\Frigate\Config”. Create a file “config.yml”. This file will contain the information that is required for Frigate to run. An elaborate documentation can be found at Frigate Configuration | Frigate
Start the Frigate with bare minimum. I would start with configuring one camera. This is what the snapshot of my first config.yml would look like.
cameras:
  Doorbell: # Name of the camera
    enabled: true
    ffmpeg:
      hwaccel_args: # Hardware Acceleration https://docs.frigate.video/configuration/hardware_acceleration/
        - -c:v
        - h264_cuvid
      inputs:
        - path: rtsp://user-name:password@<ip>:<port>/Preview_01_main
          input_args: preset-rtsp-restream
          roles:
            - record
        - path: rtsp://user-name:password@<ip>:<port>/Preview_01_sub
          input_args: preset-rtsp-restream
          roles:
            - detect
In the above setting, I have configured one camera to the name “Doorbell” and set the full quality stream to record and reduced quality to object detection. If you have a pretty good GPU or installed a coral detector, you could use a full quality which may improve the object detection, but you may not get the best bang out of the compute you are spending. You don’t really need a 4K image for object detection.
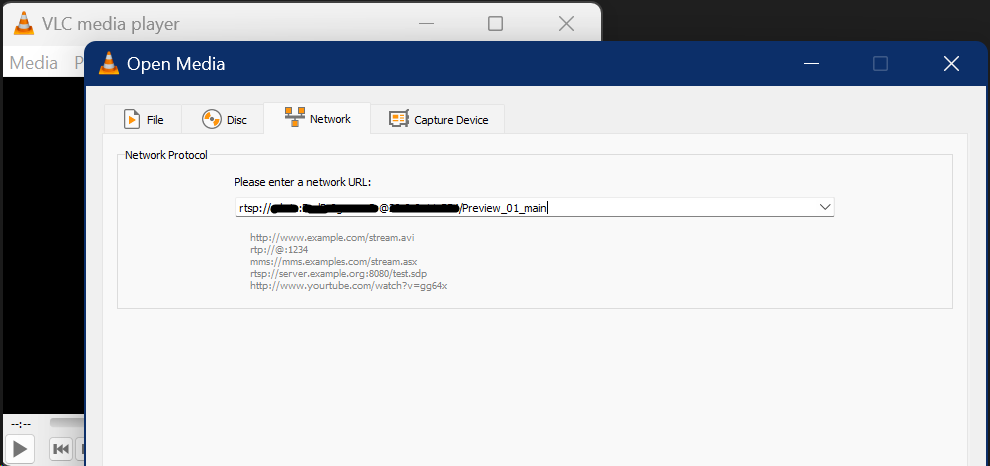
Restart the frigate container and then navigate to http://ip:5000 and at this point you should see the camera you have configured. If you dont see the camera stream, ensure that your camera is streaming in the url path that you have configured. The easiest way for you to debug is to launch vlc and specify the path in the network url. If the camera is streaming, you should see the live video. If it doesn’t, check the documentation of the camera manufacturer to find the path and format.
Once you are able to see the video in the frigate web UI, you have successfully set up the NVR. We will come back to fully configuring the cameras in our next post.
Installing Home Assistant
Home Assistant wasn’t my first choice. If you scour the internet, you will find there is at least one major alternative for HA and that was my first choice. However, after running with it few weeks, I didn’t find it as flexible as I wanted. Hence, I scrapped all my set up and restarted.
Just like Frigate, Home Assistant too offers different flavors of installation. A high-level comparison can be found at https://www.home-assistant.io/installation/#advanced-installation-methods. Given that a full support is only available in HA-OS, I chose that. Given my proficiency in Linux is non-existent, I chose Hyper-V over installing on WSL / Linux.
I allocated 6 cores out of my 12 core Xeon processor along with 4GB of startup memory. This is typically more than what HA would ask. Installation of HA, Hyper-V image is straight forward. Pretty much, you download the vhdx and then start up the OS as an image. After vhdx boots up, you will go ahead and configure your user and that’s about it. Steps you configure it can be found at https://www.home-assistant.io/installation/windows#create-the-virtual-machine
The only thing for you to keep in mind, is to create a “Virtual Switch” that is “Internal network” since we want the HAOS to connect to both IOT network and Home Internet. You can always keep two different virtual switches one for each network if you want to manage them separately. However, in my case, I am not worried about what access the machine has, as it is sitting inside my home. I would instead focus my energy on securing my network through firewall.
Configuring Network
This is probably the most important section of this whole setup. My motto is to keep the IOT devices away from internet in the local network while having the Home Assistant exposed to the internet. Below is the logical view of the setup from the perspective of network.
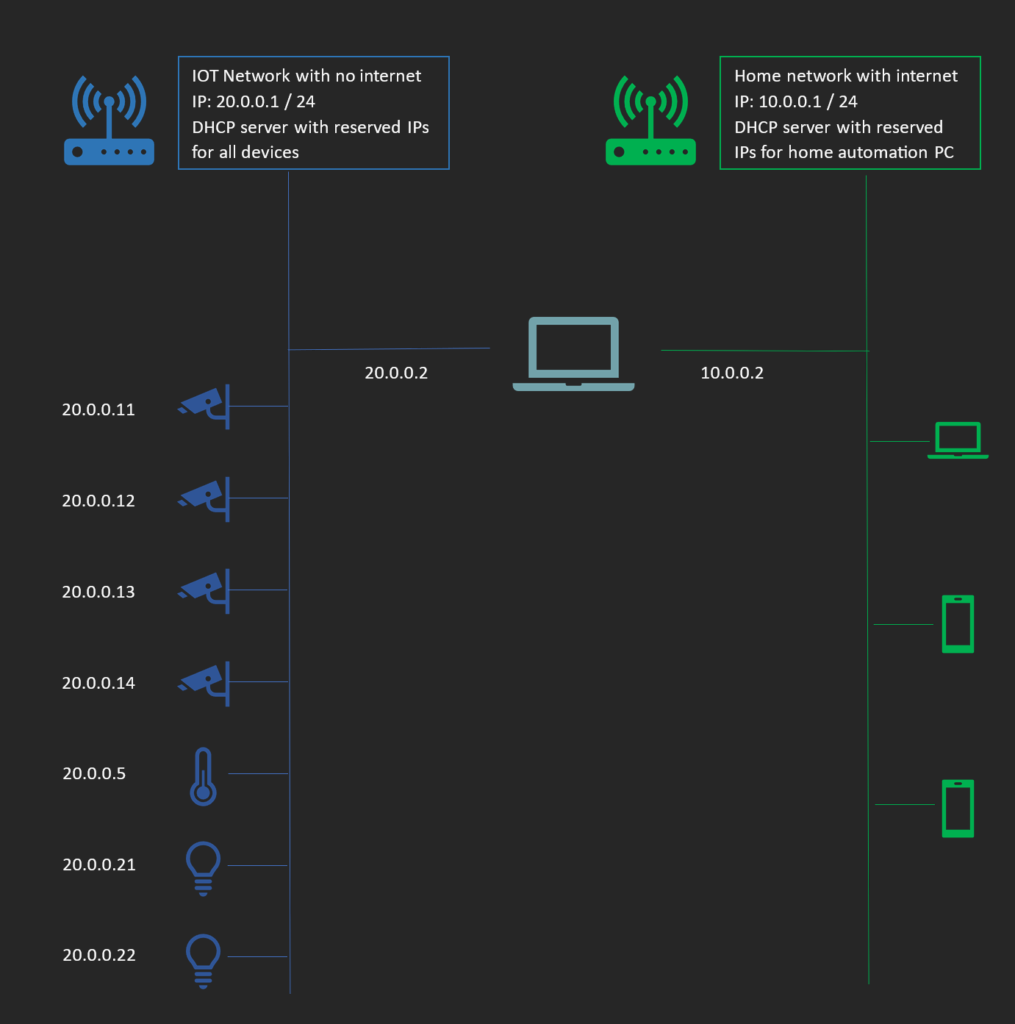
The teal-colored machine is the machine we are using for the home automation. It is part of the two different networks and can interact with them both. However, due to the network isolation, any other devices in IOT cannot see devices that are connected to home network and vice versa.
IP Configuration
I always suggest you set static IP addresses at the router level and not at the device level. Since the router is the DHCP server, if you set the static IP address at the device level, you may encounter situation where there is an IP conflict. Alternatively, you can also reserve a range to be used as DHCP should you choose to specify the static IP at the device level.
Also, in the IOT network, I would suggest setting your router to allow only devices that are allowlisted through Mac addresses. No device should be set to procure IP dynamically. Most routers allow you to configure this in the “advanced” section. This will help us with
- Identify devices uniquely and configure automation easily.
- Though mac address can be spoofed, it at least offers some security from bad actors from plugging any non-allow-listed devices to your network sockets if they are exposed anywhere. Outdoor cameras are the weakest links for such vulnerability.
Port Configuration
How we expose our devices to the outer world at the end of the day comes to what ports we decide to keep open. Windows have a set of ports that it keeps open by default. Typically, those depend on what software your machine runs. If you are going with minimal to no software on the machine, there shouldn’t be anything other than those are opened by Windows Update, Edge, Docker Desktop, etc. If you are curious, you can always check them by running TCPView for Windows – Sysinternals | Microsoft Learn. What you should be looking at are the ports that are under “Remote Port”
By now, you may have already figured out that Frigate runs on port 5000 and HA runs on 8123. The decision you will need to make here is whether you are going to expose only HA or both. You can always integrate Frigate (I will explain this in the next post) with HA and then just expose HA or you can integrate them and still expose both so that you could access them separately from your home network.
Once you have the decision, we will get to port forwarding. Of course, you can get this working without port forwarding by opening up the ports 5000 and 8123 but then, it won’t be fancy and who wants to remember port anyways. For all the hardcore network geniuses, they will need to configure them through “netsh interface portproxy” command Netsh commands for interface portproxy | Microsoft Learn. For simple people, there is Port Proxy Gui. Since I decided to map my 8123 to http, I went ahead and configured the mapping of 8123 to 80. HA defines a homeassistant.local as host name for the service and hence we will go ahead and use that. Below is what my mapping looks like.

Now, that my port is mapped, all I need to do is to open my port 80 to whichever network, I would like to. In my case, I only want it to be opened to my home network. So, I will go ahead and configure my firewall accordingly.
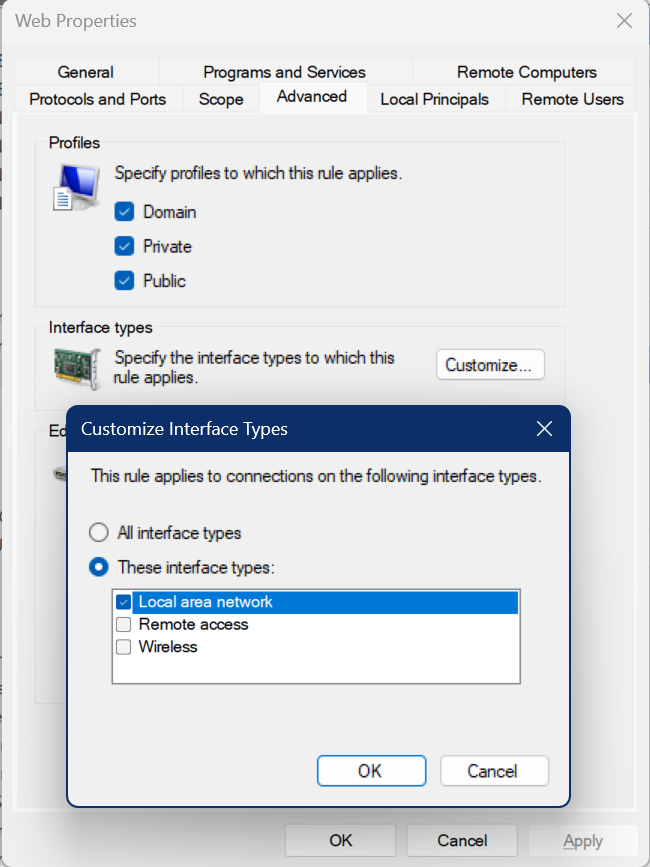
Launch Windows Defender Firewall with Advanced Security and add a new Inbound Rule. In this new rule, I named it as Web and allowed all the applications to use and opened 80 and 443 (we will configure https for HA later). In Advanced, I selected only the interface that I have for connecting to my home network. If you want your HA UX to be accessible in both IOT and home network, then don’t make any changes; by default, all the network interfaces are selected.
After you have opened the port, you can now browse your HA from any home network device by browsing http://10.0.0.2 or whichever IP you reserved for the machine.
While we are ready to expose your HA to the internet so you can access from anywhere, we will not do it until we configure https on it. If you want to expose Frigate also to your home network, you could either open the port 5000 directly in the firewall (no port forwarding required) or you could map it to a port like 81 (or any of your fav that is unused) and then configure the firewall accordingly.
What’s next
This ends our set up post. In the next post we will discuss how to integrate HA and Frigate and may be also configure https for our HA and make it accessible through internet.